Device Configuration
With a Controller or Device selected, choose Configure on the Network Menu:

Configuration settings will remain after a reboot. However, these settings will be cleared after a factory reset of the Controller / Device. Uniquely, these settings are stored on the Controller / Device itself, not in the project or as part of the upload. The Controller / Device does not have to be associated with a project to have its settings configured from Designer.
Network
Network
Use these fields to set a static IP address for the Controller, by default the Controller is set to receive an IP address from a DHCP server.
You can also set the Subnet Mask for the controller using CIDR "Classless Inter-Domain Routing", a way of specifying the range of IP Addresses that this device is able to communicate with. The number (e.g. 24) refers to the number of bits of the address that must be the same. CIDR 24 is equivalent to a Subnet Mask of 255.255.255.0 or dotted decimal notation, a Default Gateway and up to two Domain Name Servers (DNSs).
If the IP settings have been stored on the Controller's memory card as a "TPC.cfg" or "LPC.cfg" file then these fields will be greyed out.
Web Server
The ports opened by the Controller for access to the web server using HTTP or HTTPS can be manually configured. This can be useful if there are several Controllers in an installation and remote access is required via a router setup for port forwarding to each Controller.
By default the Controller uses port 80 for HTTP and port 443 for HTTPS for the web server.
Users
The Users page allows you to create users and assigned them to Access Groups.
Access to the controller and its web interface can be restricted based on one of several Access Groups.
To add a user, click the Add button. This will open a dialog which prompts for a username and password, and a Group Selection:
| Access Group | Description |
|---|---|
| Admin | User has admin control of the device, allowing uploading and access to advanced Web Interface features (File Manager, Configuration) |
| Control | User can trigger actions on the Controller (Control) |
| Status | User can access the state of the controller (Home, Project Status, Log, Output, Input, Network) |
Guest permissions can also be set here. This would determine how much of the Web Interface would not require a password. For example, setting Guest Permissions to "Status" would allow access to the Home, Project Status, etc, without needing a user to log in.
Clock
Date and Time
All Controllers have an internal realtime clock which is battery backed and so will operate even when the Controller is not powered. Whilst the internal realtime clock is accurate, the use of a Network Time server of some sort (NTP, DHCP) is recommended where possible (see above).
The Date and Time fields display the current settings of the selected Controller's realtime clock. Only the designated Network Primary needs be accurate as any other networked controllers will automatically synchronize their realtime clocks to the Network Primary.
Note that the project location settings include the correct GMT offset so, if using these location settings, you should set the time here to GMT not local time or the offset will be doubled.
To manually change the Network Primary's date and time:
- Select the Network Primary
- Enter the required settings into the Date and Time fields
- Press Set
To synchronize the Network Primary's date and time to Designer:
- Select the Network Primary
- Ensure that the PC running Designer is set to the correct date and time
- Press Sync to Designer
SNTP Server
Check this and enter the IP address of the appropriate Simple Network Time Protocol (NTP) server. You can also set the interval to Query the SNTP server for the current time. Setting the refresh interval to 'Automatic' adjusts the interval depending on how much the controller's time has drifted against the correct time. The clock will be refreshed more regularly if it is drifting from the correct time.
Note that Controllers with DHCP enabled will also synchronise with a suitably configured DHCP server.
Log
Log
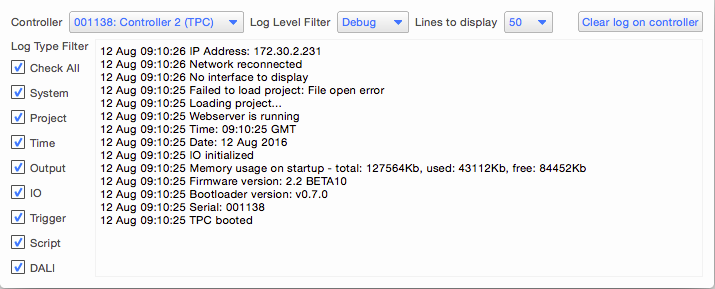
Select the verbosity (detail) of the log that can be viewed either via the web interface or from within Designer using the Controller Log Viewer in the Main Menu and selecting a Controller (which can be connected via Ethernet or USB):
Syslog
Check this to enable logging to the specified IP address. Note that there is a performance penalty to pay for using Syslog so this should only be enabled for debugging.
Storage
The capacity of the Controller's memory card is displayed here with the option to format the card if required, press "Format Memory Card". Formatting the card will erase all project data and so an upload will be required to restore normal operation.
Advanced
Hardware Watchdog
Check this to enable the internal watchdog that will reset the Controller automatically in case of a software crash as a result of either a coding error (“bug”) or a random electromagnetic event such as a power brown-out or spike, nearby lightning strike or static discharge. A startup trigger will be required to determine what the Controller should do after such a reset, see triggers.
Watchdog Protection
Repeated reset protection will remove the controllers project file from the memory card if the controller reboots 5 times within 90 seconds. We strongly recommend leaving this setting on, especially if the controller is to be accessed remotely.
Storing configuration settings on the memory card (optional)
After a reset, LPCs look for a file called "lpc.cfg" on the memory card before using its current settings. TPCs look for a file called "tpc.cfg" and TPS, TPS 5 and TPS 8 look for a file called "tps.cfg". You can use a text editor (e.g. Notepad) to create this file and copy it to the memory card to force the issue, useful for transferring the IP settings on the card with the project data. The format of the file needs to be:
ip 192.168.42.56 255.255.255.0 192.168.42.250
http 80
https 443
dns1 192.168.42.254
dns2 192.168.42.1
ntp 192.168.42.1
syslog 192.168.42.8
loglevel 3
watchdog off
| ip | Required | Defines the IP address, Subnet Mask and Default Gateway for the controller |
| http | optional | Defines the HTTP port used by the controller (default 80) |
| https | optional | Defines the HTTPS port used by the controller (default 443) |
| dns1/dns2 | optional | Defines a Domain Name Server (DNS) for the controller to use to resolve host names |
| ntp | optional | Defines the IP address of an ntp server that the controller should get its time from. |
| syslog | optional | Defines the IP Address of a Syslog server on the network |
| loglevel | optional | Defines the log level to be used by the controller, |
| watchdog off | optional | Disables the controller's watchdog (not recommended), omit line to enable watchdog |
Using the tpc.cfg, tps.cfg or lpc.cfg file to store the Controller's configuration on the memory card allows a Controller or Touch Device to be swapped, in case of failure for example, by just moving the memory card into another Controller.
Any settings within a *.cfg files will override settings set from within Designer.
NOTE: This file needs to be placed on the root of the memory card